Sunday, October 6, 2013

Dinning Room Buffet

I have been searching for a buffet piece for our dining room for months! I finally came across a piece that my husband said was JUNK! Of course it is, that's why I loved it! He helped me get it home... it is 8 feet long and about 4 feet tall so this task was more difficult than I anticipated. The pictures below show how beat up it was; no back, no sides, old yellowing paint. I had my work cut out for me! 


 I found these old cabinet doors on the side of the road about a year ago, I pulled them out and could not believe they fit!!!!!!!!!! It was a match made in heaven! The buffet was coming together!
 This is a close up after sanding and staining the top piece and you see the beginning of the distressing. It is hard to tell but it is painted mint green, not white.
 Bead board love! I used bead board for the side panels and the dividers between each shelving column.
 The color is off due to my terrible cell phone camera, but you get the idea! My new buffet! I am looking for some heavy rod iron knob type something for the door pulls. Yay!


Big Art

I needed a large piece of art, so for now this will have to do. It is large alright, 5 ft tall and 2 ft wide! Lots of fun color and texture. Mixed media, painted on reclaimed wood. Has 4 inch brown stained "frame" that sets it off the wall. I should probably goggle how to photograph art... sorry for the shadows and off centered views.

 See the gold flecks when the light hits it?


 And some close ups. Love the texture.


Saturday, April 27, 2013

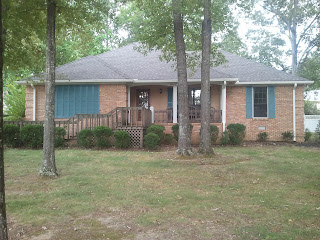
I white washed the house Sunday. Here is how it looks so far: 
 
 Before
After

I've got to get rid of that deck/ramp thing! I want walkway and stairs going straight up to the door. I think I will do another coat but we love it so far! YAY!!!

Sunday, February 3, 2013

New Couch and Chair!

Yippy!!! Things are happening on Oak lane today! We finally retired the 14 year old couch we have been using and replaced him with this couch and chair! There was a going out of business sale at a furniture store near by and were lucky to get a great deal on these little cuties. Soooo comfortable. Also you can see the new opening between the kitchen and living room. We are still looking for bar stools but are LOVING the pass through! It really has changed our quality of living here! We couldn't be more happy!


This brown beauty gave us 14 good years! Started out in the family playroom and the accompanied me through my college years and first 2 years of marriage. Can you imagine the stories it could tell!?! Thank goodness it won't be able to share! ;)

Saturday, December 22, 2012

I've been busy but not with house stuff. Here are a few things that have changed on Oak. I was not liking this lamp so I bought this new modern lamp shade and am trying it out. I have now taken the plastic wrap off. Also, you will notice the walls have been painted light gray! (Please ignore all the clutter and duck boots in the photo! haha) The yellow is disappearing slowly but surely!!

   There is a picture of my cat "Cali", our first fire in the new house, and below that a sign I made - "let's grow old and GRAY together".


 the chairs that are ever changing now they are all gray with the new fabric, the black was just too dark for me.


I painted the kitchen walls a light mint green. It is probably hard to tell in the pics. I changed my black framed cork board by painting it and covering the cork in fabric leftover from the chair. I will post more after the new year. Maybe I will tackle painting another room soon!

Monday, July 30, 2012

Pics of things changing this month on Oak

 I used painter's drop cloths to make my "linen" curtains and found the rods on big time sale at a fire-sale store! The pic below left is the living room and below right is dinning room which is on the front of the house.They will for sure look better when I paint the walls! Depending on the furniture and walls I might add some ribbon border or something on the curtains, we will see.


 I LOVE the fabric on these chairs, my sweet Gran helped me pick out the fabric when I visited her a few weeks ago, but am NOT liking it with the black chairs and brownish table top table top! I will paint them - gray maybe?


 Below the picture of our dog are three pieces of bedroom furniture i redid. I put up before and after pics so you can get the idea... The first piece is an old sewing table that I got for a few bucks at a flea market, the other dresser was given to us by family and I painted it the same so the pieces would work together! Next I will find cute bedding and paint the walls a pale green and the furniture will stand out a little more than now with the YELLOW walls. The YELLOW is haunting me in my dreams!


That is all for now! I will post more pics as I complete projects around the house.
Thanks for looking ;)

Wednesday, July 25, 2012

Bathroom Cabinet Redo... in progress

I had a break from the painting of the kitchen cabinets and decided it was time to tackle the bathroom cabinets. I read a tutorial on www.monicalikesit.com and decided to go with staining the cabinets dark to avoid painting the whole house tones of white. When we bought the house a few supplies were left in the garage so I decided to use those instead of using the products recommended by Monica. I did however follow her directions for the process.

First I removed the doors and all the hardware. Then I sanded the cabinets a little in the garage. I used a sanding block to rough up the frames still attached to the wall.This before picture is bad lighting and makes the before appear darker than it actually was. The second photo is after sanding.


 Let the fun/anxiety attack begin! I put a glove on my hand so it didn't get stain all over me and then covered the glove with one of my husbands old white socks. We had some gel stain left in the garage in a dark color, I dipped in and got busy! This is when the anxiety attack stared. It is streaky! I mean really streaky! I told my self I would do one more coat when it dried and go from there. After drying for 24 hours I did the second coat. It began looking better and I let this coat dry for another 24 hours. By the third coat of stain I was glad I chose to do this project. I let the third coat dry for about 5 days while I was out of town. Then began on the top poly coats. Again, I found some water based poly left in the garage. I got a sponge brush and did two coats of poly, allowing for 24 hours of drying time in between, making sure I went slow to avoid bubbling.


ALL DONE!!!